Spring Boot is a powerful framework that simplifies the development of enterprise-grade applications by providing a pre-configured setup that allows developers to focus more on writing business logic rather than managing configuration. In this post, we’ll dive into the architecture flow of a typical Spring Boot application, helping you understand how the components interact and how requests are processed from start to finish.
1. The Core Components of Spring Boot Architecture
Before we delve into the flow, it’s essential to understand the core components that make up a Spring Boot application:
- Spring Framework: The backbone of Spring Boot, providing dependency injection, AOP, and transaction management.
- Embedded Server: Spring Boot applications usually run with an embedded server (Tomcat, Jetty, or Undertow), making them self-contained and easy to deploy.
- Auto-Configuration: This feature automatically configures Spring components based on the dependencies present in the project.
- Spring Boot Starter Dependencies: Simplified dependency management with pre-configured starter packages like
spring-boot-starter-web,spring-boot-starter-data-jpa, etc. - Spring Boot Actuator: Provides built-in endpoints for monitoring and managing the application.
2. Request Handling in Spring Boot
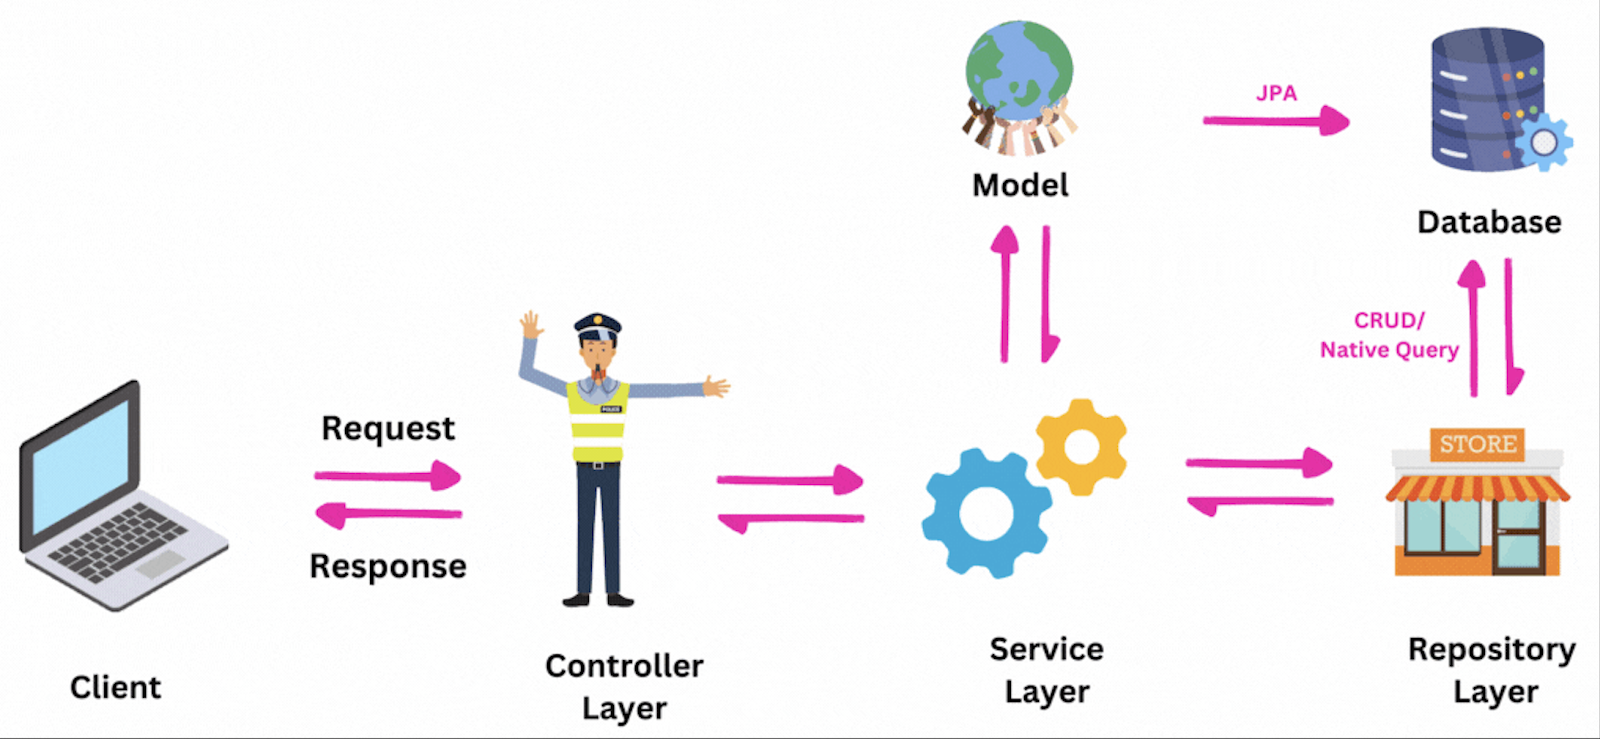
Let’s walk through the flow of a request in a typical Spring Boot application:
Step 1: Client Request
A client (browser, mobile app, etc.) sends an HTTP request to the Spring Boot application. The request is routed to the appropriate port on which the embedded server (e.g., Tomcat) is listening.
Step 2: DispatcherServlet
The embedded server receives the request and forwards it to the DispatcherServlet, which is the central dispatcher for HTTP requests. It handles all incoming requests and delegates them to appropriate components.
Step 3: Handler Mapping
The DispatcherServlet consults HandlerMapping to determine the appropriate Controller that should handle the request. HandlerMapping uses annotations like @RequestMapping to map URLs to specific controller methods.
Step 4: Controller and Service Layer
Once the appropriate controller method is identified, the DispatcherServlet invokes it. The controller method may interact with the service layer, where the business logic resides. The service layer, in turn, may interact with the data access layer (typically using Spring Data JPA) to perform CRUD operations on the database.
Step 5: Data Access and Repositories
The service layer uses repositories (interfaces that extend CrudRepository, JpaRepository, etc.) to interact with the database. Spring Data JPA automatically implements these repository methods, providing an abstraction over the database.
Step 6: Response Handling
After the controller processes the request, it returns a ModelAndView object or a JSON/XML response (in RESTful services). The ViewResolver then resolves the logical view name to a physical view (like a JSP page), or the response is directly sent back to the client.
Step 7: DispatcherServlet Response
The DispatcherServlet sends the final response back to the client via the embedded server. This response could be an HTML page, JSON data, or an error message, depending on the request type and the outcome of the processing.
3. Spring Boot Auto-Configuration
One of the key features of Spring Boot is its auto-configuration capability. When you run a Spring Boot application, it automatically configures your application based on the JAR dependencies available in the classpath. For instance, if spring-boot-starter-web is present, Spring Boot auto-configures a web application with necessary components like DispatcherServlet, ViewResolver, and so on.
This eliminates the need for manual configuration, allowing developers to get started quickly with minimal setup. However, it’s also possible to override these configurations if custom behavior is needed.
4. Spring Boot Actuator
For monitoring and managing a Spring Boot application, the Actuator module provides several endpoints that expose operational information. These endpoints can be used to check application health, metrics, environment properties, and more.
Example of Actuator Endpoints:
- /actuator/health: Provides health status of the application.
- /actuator/metrics: Exposes various metrics related to the application’s performance.
Actuator is an essential tool for maintaining application performance and health in production environments.
5. Putting It All Together
The Spring Boot architecture flow is designed to streamline the development process, offering a clear and efficient path for request processing from client to server and back. By understanding this flow, developers can better leverage the framework to build scalable, maintainable applications.
Key Takeaways:
- Spring Boot abstracts much of the configuration complexity, allowing developers to focus on business logic.
- The
DispatcherServletplays a critical role in handling requests and routing them to appropriate controllers. - The service and repository layers follow a clear separation of concerns, making the application easier to manage and extend.
- Auto-Configuration and Actuator are powerful features that enhance productivity and application management.
Understanding the Spring Boot architecture flow not only helps in better design but also in troubleshooting and optimizing your applications. Whether you’re building a simple RESTful service or a complex enterprise application, knowing how the pieces fit together is crucial for success.
Comments
Post a Comment